In the last couple of years, I’ve seen more and more teams starting to use GitHub as their primary platform for source code hosting and CI/CD for newer projects.
Therefore I want to showcase some of the more advanced capabilities of GitHub Actions workflows that can improve your developer experiences.
The Baseline Workflow
Coming from the infrastructure world, the most common use-cases I see for CI/CD workflows are created around building, testing, and deploying infrastructure code, so while I’ll take examples from that, similar ideas can be applied to other types of code projects as well.
Some of the common workflows I see are typically looking like this:
Repository checkout -> Install dependencies -> Run test/validation -> Deploy.
- uses: actions/checkout@v4- uses: hashicorp/setup-terraform@v3
- name: Terraform Fmt id: fmt run: terraform fmt -check continue-on-error: true # The check will exit with code 1 and stop the workflow unless this is set
- name: Terraform Init id: init run: terraform init
- name: Terraform Validate id: validate run: terraform validate -no-color
- name: Terraform Plan id: plan run: terraform plan -out=tfplan -no-color
- name: Terraform Apply run: terraform apply -auto-approve tfplanSimplified example of a terraform deployment workflow. Full example can be found here.
But besides adding more features to perform more advanced terraform operations, let’s have a look at some capabilities of improving the developer experience.
Accessing the GitHub Context and API
GitHub has a powerful API that allows you to interact with various aspects of your repositories, including workflows, pull requests, issues and other aspects.
It can easily be accessed by using the actions/github-script action. This action provides a Node.js environment, allowing you to write JavaScript directly in your workflow file. Since each workflow run has a built-in GITHUB_TOKEN secret which is passed into the step per default, it requires almost no setup.
A simple example of using this API in a workflow could be to get the title of the pull request that triggered the workflow:
- name: Get PR Title id: get_pr_title uses: actions/github-script@v8 with: script: | const pr = await github.rest.pulls.get({ owner: context.repo.owner, repo: context.repo.repo, pull_number: context.payload.pull_request.number }); return pr.data.titleThis capability suddenly enables us to do a lot on the GitHub platform directly from our workflows in a context aware manner.
Real World Example: Automating PR Comments
So let’s take a look at a real world example that I personally use quite often in projects with multiple contributors.
In a Terraform based project I find it quite important to have validation and visibility into the changes you are suggesting before merging a pull request. I typically see a lot of automation being built inside the github workflows, meaning that the contributor that wants to add something, might not be familiar with the workflows and I don’t necessarily see a need for everyone to have a deep understanding of the entire repository, if their task is just focused around the infrastructure of the project.
Therefore when creating a pull request I like to provide all the necessary information directly in the pull request itself, so that the contributor and reviewer can focus on the changes.
- uses: actions/github-script@v8 if: github.event_name == 'pull_request' env: PLAN: "terraform\n${{ steps.plan.outputs.stdout }}" with: github-token: ${{ secrets.GITHUB_TOKEN }} script: | const output = `#### Terraform Format and Style 🖌\`${{ steps.fmt.outcome }}\` #### Terraform Initialization ⚙️\`${{ steps.init.outcome }}\` #### Terraform Validation 🤖\`${{ steps.validate.outcome }}\` <details><summary>Validation Output</summary>
\`\`\`\n ${{ steps.validate.outputs.stdout }} \`\`\`
</details>
#### Terraform Plan 📖\`${{ steps.plan.outcome }}\`
<details><summary>Show Plan</summary>
\`\`\`\n ${process.env.PLAN} \`\`\`
</details>
*Pusher: @${{ github.actor }}, Action: \`${{ github.event_name }}\`, Working Directory: \`${{ env.tf_actions_working_dir }}\`, Workflow: \`${{ github.workflow }}\`*`;
github.rest.issues.createComment({ issue_number: context.issue.number, owner: context.repo.owner, repo: context.repo.repo, body: output })Remark (Avoiding Comment Spam)
The example below will be impractical to use as is, since it’s going to create a new comment on each workflow run. Check my advanced terraform workflow example in the GitHub repository for a more complete implementation that updates existing comments instead of creating new ones.
This leverages previous steps output and combines it with the GitHub API, which enables you to create comments directly on the pull request with all the changes that are going to be applied if the PR is merged.
So when a reviewer comes to review the changes, they don’t need to run any terraform commands locally or go into the logs of the workflow run and dig through the output, instead they get a nicely formatted comment with all the necessary information right in the PR.
From the perspective of being the one that is setting up the workflow, it’s surprisingly simple, but let’s dissect it in detail.
Tip (Inline vs in-file)
If your script is getting much longer than this, I would recommend moving it into a separate file and call it like so:
const script = require('./path/to/your/script.js'); await script(github, context, process.env, steps); // Pass in the contexts needed for your scriptBreaking Down the Implementation
Any type of variable information defined in the example above is wrapped inside ${{ }} which is the syntax for GitHub Actions expressions. This means that the expression is evaluated at runtime of the step.
You might have multiple steps before this one that you want to feed into the comment that you are creating on the PR, so it will run each of these steps first, and finally when this step is reached, it will resolve all the expressions.
Referencing Previous Steps
When defining a step in a GitHub Actions workflow, optionally you can assign an id to the step, which allows you to reference the outputs and status of that step in subsequent steps.
So in this example there are multiple variants to take note of
1. Referencing the outcome of a previous step, in this case the step with the id fmt.
The outcome property is exit-code based, so it can be success, failure, or neutral.
${{ steps.fmt.outcome }}2. Referencing output from a previous step, in this case the step with the id plan.
The stdout property contains the standard output of the command that was run in that step.
${{ steps.plan.outputs.stdout }}Remark (stdout output)
This specific output is provided by the hashicorp/setup-terraform action we used in the baseline. Standard shell steps do not automatically capture stdout to an output variable.
3. Getting variables from an earlier step.
While not in the example above, dedicated outputs can be defined via shell or powershell commands in previous steps, which can then be referenced in the same way as above.
${{ steps.<step_id>.outputs.<output_name> }}4. Getting context information about the workflow run.
GitHub Actions provides a github context that contains information about the workflow run, including details about the repository, the event that triggered the workflow, and other metadata.
Here are a few of them:
${{ github.event_name }} // The name of the event that triggered the workflow${{ github.actor }} // The username of the person who triggered the workflow${{ github.workflow }} // The name of the workflow${{ github.repo.name }} // The repository name${{ github.repo.owner }} // The owner / organization of the repositoryInteracting with the API
Now that we know how to gather all the information, it’s just a matter of putting it to use.
When running the action as a actions/github-script@v7 step, we have access to a github object that allows us to interact with the GitHub API without any further installation or authentication, since the action automatically uses the provided GITHUB_TOKEN for authentication, only requiring you to specify the permissions you need in the yaml file.
Setting permissions for the GITHUB_TOKEN
Do take note however if you need it to perform write operations, such as creating comments, you need to make sure that the token has sufficient permissions. Setting those permissions however is just adding a few lines on the top level of your workflow file.
To get you started, these are the permission scopes you will likely encounter most often:
permissions: contents: read|write // Allows reading or writing repository contents issues: read|write // Allows creating and modifying issues and comments pull-requests: read|write // Allows creating and modifying pull requests and comments id-token: write // Allows generating OpenID Connect tokens for authenticationFor our example about pull request comments, setting the pull-requests permission to write is necessary.
Creating the comment
Finally, to create the comment.
Inside the script block we got access to some functions via the github and context objects. We use the github.rest.issues.createComment method from the GitHub API, which requires us to provide the repository owner, repository name, issue number (which is the pull request number in this case), and the body of the comment.
Please note that there is a limit to how much content you can post in a single comment, so if your terraform plan output is very large, you might want to consider truncating it or providing a link to the full output elsewhere.
github.rest.issues.createComment({ issue_number: context.issue.number, // The ID number of the issue or pull request owner: context.repo.owner, // The owner of the repository repo: context.repo.repo, // The repository where the comment should be posted body: output // The content of the comment to be posted})Remark (GitHub Issue vs Pull Request API)
Don’t let the code confuse you with the issues part of the API. From the perspective of GitHub, pull requests are a type of issue, so the same API is used for both.
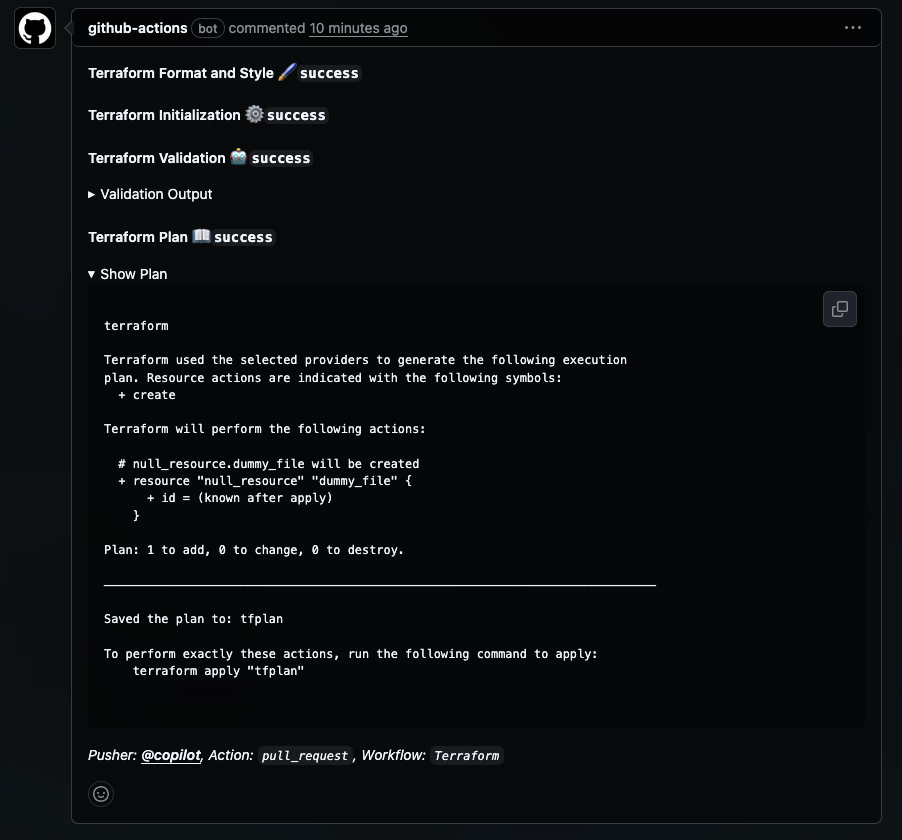
And then you are getting something that looks like this directly in your pull request:
Other ideas
To give you some more ideas to explore with the GitHub API in your workflows, here are a few suggestions:
- Labeling pull requests based on certain conditions (e.g., adding a “needs review” label if tests fail)
- Assigning reviewers automatically based on the files changed in the pull request
- Closing stale issues or pull requests after a certain period of inactivity
- Creating issues based on specific events or conditions in your workflows
- Welcoming new contributors by posting a comment on their first pull request
These are just a few more harmless ideas to get you started, but once you start exploring the API, you’ll find that there are many more possibilities to enhance your workflows and developer experience.
Some of the more advanced (and potentially dangerous in regards to permissions) could get you into automating GitHub itself and is starting to get into the realm of GitHub Workflows as an automation platform, rather than just CI/CD.
As an example I’ve seen repositories being dedicated for documenting modules in other repositories being automatically updated with version bumps and changelogs based on releases in the source repositories or repositories acting as management tools to setup and maintain other repositories in an organization.
Conclusion
I hope you enjoyed this deep dive into some of the more advanced capabilities of GitHub Actions workflows.
And in case you are interested in picking up these examples in full detail, ready to use in your own projects, you can find the full workflow examples in my GitHub repository linked below.